A koi pond is one of the most exciting elements you can add to your backyard and making one on your own is easier than you would guess. In this article, we’ll walk you through a nine-step process that will teach you how to make a diy backyard koi pond on your property.
![A Simple DIY Method to Create a Backyard Koi Pond [Gardening 101]](https://wraxly.com/wp-content/uploads/2022/05/A-Simple-DIY-Method-to-Create-a-Backyard-Koi-Pond-Gardening-101.webp)
Table of contents
- Plan Your Backyard Koi Pond Design
- Remove Existing Vegetation from Your Pond Area
- Excavate Your Koi Pond
- Set Up Pond Pumps and Filters
- Cover the Bottom of Your Pond with a Liner
- Place Boulders and Gravel at the Bottom of Your Pond
- Fill Your Koi Pond with Water
- Grow Aquatic Plants in Your Koi Pond
- Add Koi to Your Pond
- Final Thoughts on Building a DIY Backyard Koi Pond
Plan Your Backyard Koi Pond Design
Take extra care when planning your fish pond, as this stage can save you a lot of time, effort, and frustration later when you try to build your own diy backyard koi pond. There are many considerations for you to make about your pond at this stage, each of which will impact your final product. In the next three subsections, we’ll describe the top decisions you’ll need to make when designing an in-ground diy garden pond in your backyard.
Choose a Location for Your Koi Pond
The location of your pond will determine how easy it is to build, how well it will perform over the years, and how much access you’ll have for maintenance. Your first step is to choose a place in your backyard that is relatively flat and free of significant vegetation. Both those factors will make your excavation stage much simpler than it would be if you neglected them.
Your pond location should also have the ideal amount of sun exposure. Your pond should not receive too much nor too little sunlight. With too much shade, your pond plants will struggle to grow, and your pond water will be more likely to become a breeding ground for unwanted insects. Choosing a location with full sun is likely to raise the water temperature too much during the summer, which may kill your fish.
Partial sunlight is often the ideal setting for a pond, but dappled sunlight will work well too. However, you should avoid placing your pond directly below a large tree. Not only will the roots of that tree disrupt your pond, but the plant debris the tree drops into the pond will cause the water to become dirtier much faster.
Lastly, your pond should be near two specific utilities. Choose a location where you can easily access a water source for your pond, and electricity to run your pump and filtration system. The location you use should also be generally easy to access to make your ongoing maintenance chores easier.
Choose the Size of Your Pond
The next design feature you should determine for your diy backyard koi pond is the size of the pond. Compared to other fish, koi often need a considerable amount of space. Typically, it is a good idea to give your koi at least 1,000 gallons of water in which it can swim. As you would expect, the more fish you have, the more you’ll need a larger pond, but a minimum of six feet of length and width is an excellent starting point.
But while your koi pond should have considerable surface dimensions, the same is not true to the same degree regarding the pond depth. In most cases, you can dig your koi pond to be about three to four feet deep. Deeper ponds will work, too but remember that as you add depth to your pond, you are drastically increasing the volume of water you’ll need to fill it.
Sizing your pond also influences how labor-intensive the construction process will be. As is obvious, a small pond is easier to build and maintain. Aim to make a pond that is large enough to accommodate your fish comfortably but small enough that you can manage building and maintaining it on your own.

Choose the Shape of Your Koi Pond
Our third and final design consideration for your diy backyard koi pond is the shape. You should have complete control over the shape you choose to make your pond but recall that changes to the shape will also change the dimensions and volume of your pond.
Some pond builders feel tempted to create ponds with complex curving shapes. However, complicated ponds are more difficult to build accurately and are often less able to hold their shape over the years.
We suggest keeping your pond shape interesting but somewhat simple. A simple shape will be easy for you to layout and excavate and may be easier to care for as well.
When creating your pond shape, consider using a garden hose to form the outline. The flexible nature of a garden hose makes it easy to alter and rearrange your pond as you see fit. Once you make a shape you’re pleased with, mark it with paint before moving on to your next step.
Remove Existing Vegetation from Your Pond Area
Your pond area should be entirely free of any existing vegetation before you begin digging. Use shovels, hoes, and any other tools you prefer to remove any grass, shrubs, or other plants from your future pond’s location.
Notice if there are any large shrubs or trees where you wish to build your pond, as these plants will have roots that are more difficult to remove. You may also discover roots in the ground from former trees that have since been cut down.
If you find that the roots in your pond area are too robust for you to remove easily, you may want to choose an alternative place for your pond. Either way, your goal is to create a bare patch of exposed soil that roughly matches the intended shape of your pond before you move on to the next step.
Excavate Your Koi Pond
When you have removed all existing vegetation, you can start excavating. Dig until you have reached the depth that you planned in your design phase.
While you dig, you should create one or more shelves along the edge of your pond. These shelves will act as the ideal place to set many of your favorite aquatic plants.
As you dig, you’ll generate a lot of left-over soil. It’s best to have a plan regarding where to dispose of this soil before you start digging to keep it out of your way so your project can remain neat and efficient.
Set Up Pond Pumps and Filters
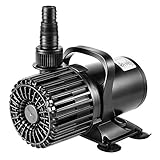
Some ponds are nothing more than a hole in the ground full of water. However, these rudimentary ponds are at great risk of accumulating filth that can lead to algae blooms and other unpleasant issues. Fortunately, you can prevent those unsavory occurrences by installing the correct pond equipment.
At the very least, your pond should include a submersible pump and a pond filter. The pump will help keep the water moving, making it more difficult for algae and other grime to build up. The filter will act with your pump to clean your pond water while it moves through the system.
The best time to install these crucial pieces of pond infrastructure is just after you have excavated. With your pond area clear and little to no other elements in the way, you’ll have an excellent opportunity to choose where your pump and filter should be so that they can work as effectively as possible once your pond is full.
Recommended Pumps and Filters
| Image | Title | Prime | Buy |
|---|---|---|---|
 | VIVOSUN 1600 GPH Submersible Water Pump Pond Pump 100W Ultra Quiet Aquarium Pump with 20.3ft Power Cord High Lift for Pond Waterfall Fish Tank Statuary Hydroponic | PrimeEligible | Check Price on Amazon |
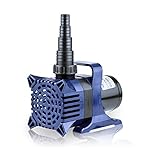
Top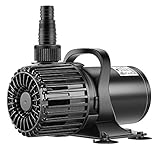 | VIVOHOME Electric 120W 2700GPH Submersible Water Pump for Koi Pond Pool Waterfall Fountains Fish Tank and Aquarium | PrimeEligible | Check Price on Amazon |
 | Alpine Corporation Alpine PAL3100 Cyclone Pond Pump-3100 GPH-for Fountains, Waterfalls, and Water Circulation Pump, 10.8"L x 6.1" W x 8.9"H, Black and Blue | PrimeEligible | Check Price on Amazon |
 | OASE BioSmart 5000 Pond Filter | PrimeEligible | Check Price on Amazon |
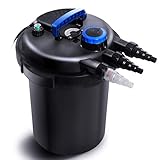
 | VIVOHOME Pressurized Biological Pond Filter with 13-watt UV Light, Up to 1600 Gallons | PrimeEligible | Check Price on Amazon |
 | HAPPYGRILL Pond Filter 4000 Gallons Pond Pressure Bio Filter with 13W UV Light | Prime | Check Price on Amazon |
Cover the Bottom of Your Pond with a Liner
While it will be mostly unseen once your pond is complete, a pond liner is an essential component of any backyard koi pond. A pond liner is nothing more than a durable sheet that lines the bottom and sides of your newly excavated pond hole.
Pond liners are vital to the longevity of your pond and are not something you should overlook during construction. The main purpose of your pond liner is to prevent the water from soaking into the soil, which helps keep your pond water at a consistent level.
There are many types of pond liners you can find for sale, including some natural options. However, the most popular and effective liners for backyard ponds are often made of a strong PVC or rubber material. Once you set these liners in place, your pond will be nearly ready to hold water without letting it leak into the earth below.
Recommended Pond Liners
| Image | Title | Prime | Buy |
|---|---|---|---|
 | TotalPond pond skins Pond Liner, 13 by 20-Feet | PrimeEligible | Check Price on Amazon |
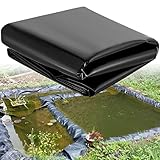
Top | COOCURE 15x20 ft and 20 Mil Thickness Pond Liner, Pliable & Durable LLDEP Material, A Liner for Fish or koi Pond, Waterfall Base, Fountain and Bed Planter(15x20 ft, 20Mil, LLDPE, Black) | PrimeEligible | Check Price on Amazon |
 | Gonioa 15.6 Mil Pre-Cut Pond Liner,Fish Pond Liner,10 by 13-Feet Pond Skins Liner HDPE Pond Liner for Koi Ponds, Streams Fountains and Water Gardens,Black | PrimeEligible | Check Price on Amazon |
 | 15 x 20 Feet Pond Liner 20 Mil, LDPE Pond Skins for Fish Ponds Stream Fountain Water Garden, Black Waterfall Backyard Koi Pond Liner, Easy Cutting Underlayment Pond Liners (15FT×20FT) | PrimeEligible | Check Price on Amazon |
 | GROWNEER 13 x 20 Feet 14.5 Mil HDPE Pond Liner Pond Skins for Fish Ponds, Streams Fountains and Water Gardens | PrimeEligible | Check Price on Amazon |
 | Happybuy LLDPE Pond Liner 20x25 ft, Pond Liner 20 Mil, Fish Pond Liners for Waterfall, Pond and Fish Ponds | PrimeEligible | Check Price on Amazon |
Place Boulders and Gravel at the Bottom of Your Pond
Cover your pond liner with boulders, river rocks, and gravel. These rocks will serve at least two purposes for your koi pond that will contribute to its overall longevity and appearance.
First, while many pond liners are resilient, they can break down if they experience prolonged sun exposure. Using a complete layer of gravel and stones covers your liner, acting as a barrier that will delay or prevent the decay the sun’s rays can cause.
Stones at the bottom of your pond also add your pond’s natural look and visual charm. A plain liner, or any soil that may become exposed after your pond is built, is not nearly as attractive as a well-selected mix of boulders and natural rocks.
HANDPICKED RELATED CONTENT: Choosing the Best Water Plants for Ponds
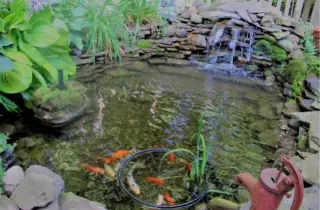
Fill Your Koi Pond with Water
Now comes one of the more predictable steps towards building a koi pond in your backyard. With your pond excavated, lined, and holding a layer of stones, you can begin filling it with water.
Using a standard garden hose is a great way to fill your new pond for the first time. However, you should know that untreated hose water can contain chlorine and other chemicals that may not be healthy for your pond and those who live in it.
The best approach is to use a pond treatment product after you fill your pond with hose water. These treatments will make your pond water clean and suitable for any fish or plants that will call it home.
Recommended Books on Building a Koi Pond
| Image | Title | Prime | Buy |
|---|---|---|---|
 | The EZ Guide to Building a Koi Pond: Welcome to the Wonderful World of Koi | PrimeEligible | Check Price on Amazon |
Top | The Pond Owner's Problem Solver: Practical and Expert Advice on Designing, Stocking and Managing Ponds | Prime | Check Price on Amazon |
 | Build Your Own Koi Fish Pond: Keep Your Koi Fish Healthy And Long Living. | PrimeEligible | Check Price on Amazon |
 | THE COMPLETE GUIDE TO BUILDING A KOI POND: Discover 5 Steps To a Perfect Koi Pond and Feeding Of Koi Fish | PrimeEligible | Check Price on Amazon |
 | Building a koi pond: How to build a koi pond - ultimate step by step guide | PrimeEligible | Check Price on Amazon |
Grow Aquatic Plants in Your Koi Pond
Aquatic plants will benefit your koi pond in several ways, and this is the stage at which you can start growing them. Such plants can transform your pond into a more comprehensive water garden. Begin by selecting a group of plants that grow well in or just outside of the water and will survive in your region and specific pond location.
Again, the shelves you created during the excavation stage will be a perfect setting for many of your favorite pond plants. You can plant these species in containers and simply place them in an open location on one of your shelves. Additionally, there are other pond plant species that will grow best if you plant them directly in the soil at the edge of your pond.
Pond plants come with a long list of advantages, including acting as a biological filter that will aid in keeping your pond clean. Plants also provide food and shelter for pond-dwelling animals while also contributing to a complete and healthy pond ecosystem. Along with those benefits, plants will go a long way toward making your pond look much more beautiful and vibrant than it otherwise would.
Best Water Plants to Use in Your DIY Backyard Koi Pond
1. Water lilies
Water lilies are beautiful, vibrant flowers that are a great addition to any koi pond. These aquatic plants come in a wide range of shapes, sizes, and colors, providing pops of color and texture to the pond ecosystem. Not only do water lilies look great, but they also play an important role in the health of koi fish. For one thing, these plants provide young koi with protection from predators lurking at the water’s surface. In addition, water lilies also help to keep ponds oxygenated by producing oxygen through photosynthesis. As such, adding a few hardy water lilies to your koi pond is a great way to enhance beauty and support the health of your precious fish. So what are you waiting for? Go ahead and start growing your own stunning water lilies today!
2. Lotus plants
Lotus plants are a common sight in koi ponds for a few reasons. For one, they help to keep the water clean by absorbing nutrients from the water. Additionally, their roots help to promote the growth of beneficial bacteria, which can help to filter the water and keep it healthy. Furthermore, lotus plants provide shelter and shade for koi fish, and their leaves can also be used as food. As a result, lotus plants can play an important role in the health of a koi pond.
3. Marginals like pickerel weed and cattails
If you’re planning on adding pickerel weed and cattails to your koi pond, there are a few things you should know. Pickerel weed is an excellent source of oxygen for your pond, and it also provides valuable shade and hiding places for your fish. Cattails are also great for providing oxygenation and shading, and their long roots help to stabilize the pond bottom. In addition, both pickerel weed and cattails are very effective at filtering out excess nutrients and pollutants from the water. As a result, they can help to keep your pond clean and healthy. So if you’re looking to add a few more green plants to your koi pond, pickerel weed and cattails are two great choices.
HANDPICKED RELATED CONTENT: Instant access to over 7000 landscape ideas & designs
4. Floating plants like water hyacinth and water lettuce
Water hyacinths and water lettuce are two plants that can be extremely beneficial to your koi pond. Not only do they provide decorative and aesthetic value by adding color and texture to the pond, but they also help to keep your pond clean. The plants act as natural filters, absorbing excess nutrients from the water and preventing algae growth. Additionally, the roots of these water plants help to stabilize the pond’s ecosystem by providing support for aquatic organisms like fish and frogs. If you’re looking for an easy way to improve your koi pond, then growing a few water hyacinths or water lettuces is definitely worth considering!
FURTHER READING
- How to grow lily pads in a pond
- Water Lily vs. Lotus – What’s the Difference?
- 13 Beautiful Backyard Pond Ideas [with Pictures!]
5. Submerged plants like hornwort and anacharis
There are a number of reasons why growing hornwort and anacharis in a koi pond can be beneficial. First, both plants are quite fast-growing, which means they can help to keep the water clear by intercepting floating debris. In addition, their dense root systems help to stabilize the soil and prevent erosion. Finally, both hornwort and anacharis releases nutrients into the water that help to support the growth of other aquatic plants. Whether you’re trying to create a healthy ecosystem in your pond or simply want to make sure it stays looking great all year round, growing these popular aquatic plants is definitely worth considering.
Add Koi to Your Pond
Our final step for making a diy backyard koi pond is to introduce the koi themselves. However, this process can be a bit more in-depth than you might expect. We won’t cover all the details of how to properly acclimate a koi to a new pond, but we will give you a quick overview of the process.
Once you obtain your fish, it’s wisest to house them in a tank before you put them into your pond water. When your koi is in this tank, sometimes called a quarantine tank, you should monitor its health and watch out for any signs of disease. Spending time in the tank also lets your koi recover from transportation before it starts living in your pond full time.
Keep your koi in the quarantine tank for at least two weeks while maintaining the ideal water conditions. If, after at least two weeks, you notice no sign of disease or poor health, you can begin transferring your koi to your pond. Transfer the koi slowly and carefully to give them the best chance to acclimate to your pond.
Final Thoughts on Building a DIY Backyard Koi Pond
A backyard DIY pond garden is one of the best ways to create a peaceful outdoor retreat and impress anyone who visits your yard. With the nine easy steps described in the article above, you’ll be well-prepared to take on this project and build a healthy pond full of beautiful koi fish.

John Haryasz is a freelance writer and landscape designer. In the field of landscape architecture, he has contributed to many successful design projects throughout the country. As a writer, John specializes in creating captivating and informative web content. Through that work, he aims to share his design knowledge and promote engagement with the outdoor world.