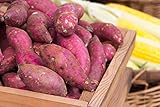
Who wants to grow some sweet potato treats? With sweet potatoes, you get many great vitamins, improved gut health, an improved immune system, healthy vision, and brain function, and you’re also less prone to cancer! What more could we ask for from a tuber?
Unfortunately, though, sweet potatoes at the grocery store may not be the best for you since they’re often loaded with hormones and chemicals that can harm your body in the long run. And the organic ones are usually much more expensive. Growing sweet potatoes in grow bags might just be the perfect thing for you. You get fresh, organic sweet potatoes to enjoy while saving money at the same time. It’s a win-win!
However, if you want to lead a successful process of growing sweet potatoes, you don’t want to ignore any of the steps in this article because each one of them is essential for a delicious, healthy yield.
So, if you’re ready to find out what steps you need to take to start growing sweet potatoes in grow bags, let’s jump to the first step!

In a Hurry? Here are Our Top Picks…
| Image | Title | Prime | Buy |
|---|---|---|---|
 Top
Top | Sweet Potato Seeds, 50Pcs Purple Sweet Potato Seeds | PrimeEligible | Check Price on Amazon |
Top Top
Top | Sweet Potato Plants/Slips - Georgia Jet. Fast Growing potatoes in only 90 days (25 slips) | Prime | Check Price on Amazon |
 Top
Top | 12 Sweet Potato, RED Japanese Plants - Organic Heirloom Vegetable Vine Slips | Prime | Check Price on Amazon |
 Top
Top | Purple Majesty Seed Potato 6 Tubers - Heirloom - Great Taste! | Prime | Check Price on Amazon |
 Top
Top | Centennial Sweet Potato Plants/Slips - America's most popular sweet potato, good for short-season areas | Prime | Check Price on Amazon |
Step 1: Choosing the Right Sweet Potato
Your sweet potato tubers must be able to produce shoots to multiply. It’s possible that your sweet potato has been treated with harmful chemicals during the growing and shipping process, which might be why it won’t grow shoots.
These chemicals stop potatoes from growing any shoots. They are, of course, still edible, but it’s not possible for you to produce any new potatoes out of them. Make sure your sweet potato has little to no chemicals or choosing an organic one to use as a stock to grow more.
Step 2: Start Sweet Potato Slips
Sweet potatoes don’t grow from seeds but rather potato slips. Slips are the green vines growing out of sweet potatoes when they sprout. They’re planted to create new sweet potato plants. One sprouting sweet potato can produce a minimum of 15 slips. If you have a very short growing season, start the slips a couple of weeks before the last frost date.
We’re going to follow the traditional water method to start sweet potato slips. Using toothpicks, suspend half of your sweet potato in a jar full of water. Make sure that the rooting end goes in the water.
Here are some ways to tell the difference between the sprouting end and the rooting end:
- If you find small thin roots on one end, you know it’s the rooting end.
- If you find out that one end of the potato is larger or has many eyes, that’s usually the sprouting side.
- The end that tapers is most often the rooting end.
The bottom, or rooting, half of the potato should be deep in water, and the top half, the sprouting half, should be above your jar. You will then notice that roots start forming out of the potato and into the water, and sprouts start forming out of the top side of the potato. If you do, put it in a warm place, such as near a sunny window, to speed up the process.
Replace the water every week to keep it level up in your jar and fresh. You’ll start seeing roots developing first within a few weeks, and you’ll also see sprouts starting to form on the suspended potato. When several sprouts reach the length of 5-6 inches, remove them by twisting them off carefully or cutting them off at soil level.
Remove any leaves that grow too low out of the sprouts, and submerge the roots in water. Because roots develop quickly, you should start seeing them in 1-2 days. To keep the slips healthy, change the water once a week and dump rotten or wilted slips.
After two weeks, the vines should have sprouted roots in your water. This means it’s time to start planting.

- Delicious, nutritious, and surprisingly easy to grow, sweet potatoes are a fun and rewarding additional to any vegetable garden or edible landscape. This concise guide shares the best practices for growing this often-overlooked crop in home gardens, shows readers how to start and plant their own sweet potato slips from store-bought tubers, and includes advice for harvesting, curing, and storing homegrown sweet potatoes for wintertime use.Features full-color photographs throughout and includes includes advice for growing sweet potatoes in containers, traditional vegetable gardens, and edible landscapes. This is the perfect guide for any gardener looking to grow abundant and healthy sweet potatoes in their garden or landscape, and then enjoy their delicious success all winter long. Author and gardener Cristina Santiestevan perfected these techniques in her own organic vegetable garden. She routinely harvests enough sweets to eat all winter long, with some left over to start her own slips again the following spring.
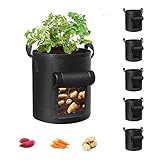
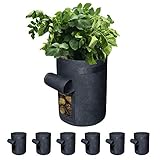
Step 3: Set Your Bag Up
Start by flattening your bag’s bottom so it sits level on the ground; roll the bag’s top down until it’s around one foot tall. Fill your bag with around 4” of potting soil mixed with straw to make a healthy growing environment for your potatoes. Now it’s time to plant your sweet potatoes!
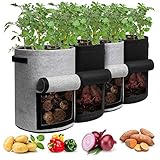
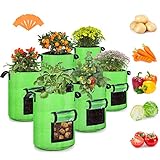
Here’s Our Recommended Grow Bags
| Image | Title | Prime | Buy |
|---|---|---|---|
 | Cavisoo 5-Pack 10 Gallon Potato Grow Bags | PrimeEligible | Check Price on Amazon |
Top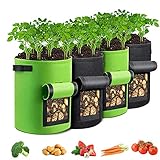 | GORDITA Grow Bags- 4 Pack Potato Grow Bags with Flap- 10 Gallon Potato Planter Bags | PrimeEligible | Check Price on Amazon |
 | Gardzen 6 Pack BPA-Free 10 Gallon Vegetable Grow Bags with Access Flap and Handles | PrimeEligible | Check Price on Amazon |
 | Potato Grow Bags with Flap 10 Gallon, 4 Pack Planter Pot with Handles and Harvest Window | PrimeEligible | Check Price on Amazon |
 | 10 Gallon Potato Grow Bags, 6 Pack, Two-Sides Window Garden Planting Bag | PrimeEligible | Check Price on Amazon |
Step 4: Plant Your Slips
To grow, sweet potatoes need a long growing season (between 100-140 days). And in contrast to normal potatoes, sweet potatoes have vines that grow in a very odd manner; they curve and twist around in a way that sets them apart from normal potatoes. You really don’t want to grow your potatoes in soil that is less than 50 degrees Fahrenheit. Otherwise, they’ll morph into brown mush that is completely inedible.
In the beginning, sweet potatoes grow slowly, but they quickly become ready to harvest once the summer’s dog days come.
As soon as the frost isn’t a threat anymore and your soil is back up to 60° F, tuck 3-4 slips 4 inches deep and 12-18 inches apart into your soil, cover it with 4 inches of the straw mix, and water it. Leave everything in the sun while making sure the soil stays moist. You can do this earlier, so long as you keep your bag indoors, away from the cold, and at the right temperature.
As your sweet potato plants grow a little bit, unfurl your rolled-down bag gradually, and add more substrate around them, keeping everything buried in the soil (except the leaves). It’s important to keep some moisture in your soil, but don’t water it until it becomes soggy.
Don’t fertilize your potatoes as this will encourage foliage growth rather than root growth, and sweet potatoes are roots, so that’ll lead to a lesser crop. Because sweet potato plants are sensitive to cold temperatures, you can cover your plants at night, or better, bring your bag inside until the temperature goes back up.
A temperature of 75° F is preferred, but sweet potatoes can survive in temperatures down to 60° F. The soil in grow bags is most probably warmer than it is in the ground soil, another great perk of growing in fabric bags!
Step 5: Harvest Your Sweet Potatoes
Your potatoes should take 4-5 months to be ready for harvest. It depends on which variety you grow and the area you live in. You know your potatoes are ready when the leaves’ color turns yellow and the vines turn black. Using a sharp knife or scissors, cut your bag open from the side and carefully pull the potatoes out.
Brush off any dirt and lay your potatoes indoors to dry for 1-2 weeks. You can give your chickens (if you have any) stems, roots and leaves as a treat! And as for your delicious potato harvest, you can cook that and enjoy it with your flock too. Also, make sure to save some of your sweet potatoes for the next year’s crop!
How to Make Sweet Potato Fries
Step 6: Storage
After harvesting your potatoes, it’s recommended to leave them in a warm, humid place at 80°F for around 2 weeks. Doing this will allow the sweet potatoes to cure and encourage them to make a layer of suberin, a protective layer that helps extend their lifespan.
Storing sweet potatoes in a refrigerator will lead to an unpleasant taste and a hard center. Instead, you can store whole sweet potatoes in a dark, cool, dry place (a basement or root cellar, for example) at 55-60° F. Another thing you can do is to cut them into big pieces and put them raw in your freezer.

- SAVE YOUR SPUDS: stop potatoes from sprouting and keep them fresh for longer with this potato bag
- BLACKOUT LINING: light is the enemy of fresh potatoes, so this sack is lined with a special light-blocking material
- INSPIRED BY NATURE: made of natural hessian, it will bring timeless, agrarian vibes to your kitchen or store cupboard
- EASY TO STORE: the hessian sack has a drawstring for easy access, and will store easily on a shelf, or hung on a hook
- USEFUL INFO: measures 24 x 24 cm (9½ x 9½) to hold a generous amount of potatoes; comes with KitchenCrafts 12 month guarantee
Bottom Line
And that’s it! You’ve successfully grown a tuber that is a super-rich source of beta carotene, vitamins, and minerals. Not only that, but it’s also delicious as both sweet and savory. Overall, they’re nutritious, easy to grow, and can easily be incorporated into your diet.
Though it might seem like a hassle to you to grow sweet potatoes, it’s much easier than it sounds if you follow the right steps. So, whether you fry them, roast them, make a sweet potato pie, or even eat them raw, you can now enjoy your organic, home-grown sweet potatoes anyhow you want!
Darrell has a passion for gardening that he inherited from his father. Go here to read more about the influence his father played in his love for gardening. If you want to send Darrell a quick message, then visit his contact page here.

![Container gardening for beginners [Buying guide]](https://wraxly.com/wp-content/uploads/2021/02/Container-gardening-for-beginners-Buying-guide-1200-1024x576.webp)